Tuesday, June 2, 2009

Add image thumbnails to folders in Windows Explorer

When you are dealing with a folder in Microsoft Windows containing numerous images, it is often very helpful to see thumbnail representations of those images in the Windows Explorer display. This built-in functionality is available in both Windows XP and Windows Vista, but how you turn the feature off and on is slightly different for each version.
One caveat for the resource-sensitive: turning on the thumbnail feature will increase the amount of resources being used by the operating system. Those little thumbnails take up space on the hard drive and in memory when they are being displayed. Depending on your system, the available resources, and the number of images involved, you can quickly bog down your PC if you are not careful. This is why many users will be interested in this tip for the opposite reason — they want to know how to turn off thumbnail creation in Windows.

Windows XP

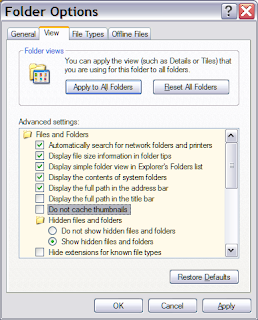
Open Windows Explorer and navigate to the folder of images for which you would like to see thumbnails. On the Windows Explorer menu, click Tools | Folder Options to get to the Control Panel. Click the View tab, as shown in Figure A.

Figure A

XP Folder Options - View

Under the Files And Folders section, you will see the Do Not Cache Thumbnails check box. If this box is checked, there will be no thumbnails cached on your hard drive. So if you want thumbnails, you will want to uncheck it. Click OK after you’ve made your selection.

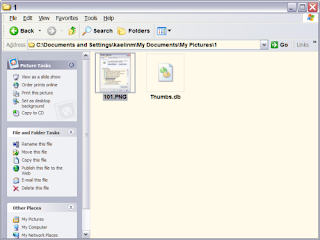
To start seeing thumbnails, you have to change views in Windows Explorer. On the menu bar, click View | Thumbnails, and Windows will replace the normal file icons with thumbnails of the images. Windows will also create a new file in that folder called Thumbs.db, where the thumbnail information is stored, as shown in Figure B.

Figure B

Thumbnails - XP

The Thumbs.db file will be created in every folder you designate to display thumbnails. To apply your changes to all Windows Explorer folders, navigate to Tools | Folder Options and click the View tab. From there, make your changes and then click the Apply To All Folders button before you click OK.

Windows Vista

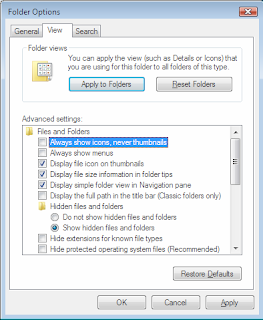
Turning on the thumbnail feature is slightly different in Windows Vista. Open Windows Explorer and navigate to the images folder where you would like to see thumbnails displayed. On the menu, click the Organize tab and then Folder And Search Options. On the ensuing control applet, click the View tab, as shown in Figure C.

Figure C

Vista Folder Options - View

Under Files And Folders, uncheck the Always Show Icons, Never Thumbnails check box. That will turn on thumbnails for that particular folder. If you want to apply the change to all folders, you should click the Apply To Folders button. Click OK to finish the process.

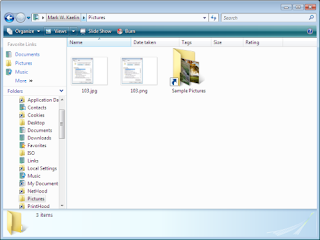
Just as you did in Windows XP, for Vista you have to take one more step to actually reveal thumbnails in Windows Explorer. On the Explorer menu, click the down arrow next to Views and select a view other than List or Details (see Figure D).

Figure D

Thumbnails - Vista

Windows Vista has an additional way to view thumbnails in Windows Explorer. Click Organize | Layout and choose to add the Preview Pane. That selection will add an area to the right of the display where a larger thumbnail of each image will be displayed as you highlight it, as shown in Figure E.

Figure E


Preview Pane - Vista

Once again remember the caveat: thumbnails take up resources. Be careful how you use them. And if there comes a time when you want to turn them off, just do the opposite of the procedures described here. In Windows XP, you would also want to delete the Thumb.db file in each folder.

Monday, June 1, 2009

Windows Recovery Console Commands

The Windows Recovery Console is used to obtain access to your computer without starting the Windows graphical user interface. With the Windows Recovery Console, you can:

- Use, copy, rename, or replace system files and folders.
- Enable or disable services or device startup for the next time that you boot your computer.
- Repair the file system boot sector or the Master Boot Record.
- Create and format partitions on drives.

Here are the available commands that can be used with the Windows Recovery Console.

ATTRIB
Use the attrib command with one or more of the following parameters to change the attributes of a file or a folder:

BATCH
batch inputfile [outputfile]
Use this command to run commands that are specified in a text file. In the command syntax, inputfile specifies the text file that contains the list of commands to be run, and outputfile specifies the file that contains the output of the specified commands. If you do not specify an output file, the output appears on the screen.

BOOTCFG
Use this command for boot configuration and recovery.

CD and CHDIR
Use the cd and chdir commands to change to a different folder.

CHKDSK
chkdsk drive /p /r
The chkdsk command checks the specified drive and repairs or recovers the drive if the drive requires it.The command also marks any bad sectors and it recovers readable information.

CLS
Use this command to clear the screen.

COPY
copy source destination
Use this command to copy a file.

DEL and DELETE
del drive: path filename
delete drive: path filename
Use this command to delete a file.

DIR
dir drive: path filename
Use this command to display a list of files and subfolders in a folder.

DISABLE
disable servicename
Use this command to disable a Windows system service or driver.

DISKPART
diskpart /add /delete device_name drive_name partition_name size
Use this command to manage the partitions on your hard disk volumes.

ENABLE
enable servicename start_type

You can use the enable command to enable a Windows system service or driver.

EXIT
Use the exit command to quit the Recovery Console.

EXPAND
expand source [/F:filespec] [destination] [/y]
expand source [/F:filespec] /D
Use this command to expand a file

FIXBOOT
fixboot drive name:
Use this command to write the new Windows boot sector code on the system partition.

FIXMBR
fixmbr device name
Use this command to repair the MBR of the boot partition.

FORMAT
format drive: /Q /FS:file-system
Use this command to format the specified drive to the specified file system.

LISTSVC
The listsvc command lists all available services, drivers, and their start types for the current Windows installation.

LOGON
The logon command lists all detected installations of Windows and then requests the local administrator password for the copy of Windows that you want to log on to.

MAP
map arc
Use this command to list drive letters, file system types, partition sizes, and mappings to physical devices.

MD and MKDIR
The md and mkdir commands create new folders.

MORE
more filename
Use this command to display a text file to the screen.

RD and RMDIR
Use rd and rmdir commands to delete a folder.

REN and RENAME
Use the ren and rename commands to rename a file.

SET
You can use the set to display or modify four environment options.

SYSTEMROOT
The systemroot command sets the current working folder to the %SystemRoot% folder of the Windows installation that you are currently logged on to.

TYPE
type filename
Use the type command to display a text file.

Do You Really Want To Improve Your Typing Speed?

How to Improve my Typewriting Skill?
It is very easy to type in computer keyboard than traditional typewriter.But only few people know the rules of Typewriting.Others are randomly picking a key on their keyboard.There is nothing wrong in it.
Because they practiced like this.One of my friend who is having 12+ years of experience in Information technology field.He also doesn't know Rules of Typewriting.But he is typing rapid fast. His speed is > 75 WPM.Do you want to know the rules for Typing?

Do you really want to improve your typing skill?

Here is the 3 web site links for you. Go and Enjoy.

http://www.powertyping.com/

http://www.artypist.com/en/typing/index

http://www.software-giant.com/software/v_0_3/

50+ Microsoft Word Shortcuts

Shortcut Keys Description

Ctrl + A Select all contents of the page.

Ctrl + B Bold highlighted selection.

Ctrl + C Copy selected text.

Ctrl + D Open the font dialogue box.

Ctrl + E Aligns the line or selected text to the center of the screen.

Ctrl + F Open find box.

Ctrl + G Open find and replace box.

Ctrl + H Also opens find and replace box.

Ctrl + I Italicise highlighted selection.

Ctrl + J Justify (spread) the text across the page.

Ctrl + K Insert link.

Ctrl + L Aligns the line or selected text to the left of the screen.

Ctrl + M Indent the paragraph.

Ctrl + N Open a new document.

Ctrl + O Open a document stored on your hard drive.

Ctrl + P Open the print window.

Ctrl + R Aligns the line or selected text to the right of the screen.

Ctrl + S Saves the current document.

Ctrl + U Underline highlighted selection.

Ctrl + V Paste contents of clipboard.

Ctrl + W Closes the current document.

Ctrl + X Cut selected text.

Ctrl + Y Redo the last action performed.

Ctrl + Z Undo last action.

Ctrl + Shift + F Change the font.

Ctrl + Shift + > Increase selected font +1pts up to 12pt and then increases font 
+2pts.

Ctrl + ] Increase selected font +1pts.

Ctrl + Shift + < style="margin-top: 0px; margin-right: 0px; margin-bottom: 0px; margin-left: 0px; padding-top: 0px; padding-right: 0px; padding-bottom: 0px; padding-left: 0px; ">decreases font by +2pt.

Ctrl + [ Decrease selected font -1pts.

Ctrl + Shift + * View or hide non printing characters.

Ctrl + Moves one word to the left.

Ctrl + Moves one word to the right.

Ctrl + Moves to the beginning of the line or paragraph.

Ctrl + Moves to the end of the paragraph.

Ctrl + Del Deletes word to right of cursor.

Ctrl + Backspace Deletes word to left of cursor.

Ctrl + End Moves the cursor to the end of the document.

Ctrl + Home Moves the cursor to the beginning of the document.

Ctrl + Spacebar Reset highlighted text to the default font.

Ctrl + 1 Single-space lines.

Ctrl + 2 Double-space lines.

Ctrl + 5 1.5-line spacing.

Ctrl + Alt + 1 Changes text to heading 1.

Ctrl + Alt + 2 Changes text to heading 2.

Ctrl + Alt + 3 Changes text to heading 3.

Ctrl + F1 Open the Task Pane.

F1 Open Help.

Alt + Ctrl + F2 Open new document.

Ctrl + F2 Display the print preview.

Shift + F3 Change the text from upper to lower case or a capital letter at the 
beginning of every word.

Shift + Insert Paste.

F4 Repeat the last action performed.

F5 Open the find, replace, and go to window in Microsoft Word.

Ctrl + Shift + F6 Opens to another open Microsoft Word document.

F7 Spell and grammar check selected text and/or document.

Shift + F7 Runs a Thesaurus check on the word highlighted.

F12 Save as.

Shift + F12 Save.

Ctrl + Shift + F12 Prints the document.

Alt + Shift + D Insert the current date.

Alt + Shift + T Insert the current time.

To remove Autorun.inf

Registry Disabled to enable
Task manager Disabled to enable
Enable Folders options
Enable run
Enable command prompt
It is disable auto play option
Write protecting to ur pen drive

Thursday, May 28, 2009

Recover a damaged Windows XP user profile

A user profile on a Microsoft Windows XP system contains all the files and settings needed to configure your work environment. If the user profile becomes damaged, Windows XP will display one of two error messages when you to log on to the system: Windows cannot load your profile because it may be corrupted. You may be logged in using a temporary User Profile.
OR:
The system has recovered from a serious error. The operating s ystem will then automatically create a new user profile and log you into this new profile. When this occurs, you’ll immediately discover that all of your personalized settings -- such as color scheme, wallpaper, and icons -- are gone. Even more disturbing is that the My Documents folder doesn’t show any of your documents. You’ll also dis cover that Outlook Expres s and Internet Explorer will be void of any of your personal settings and data. When this happens, it’s very easy to quickly go into panic mode and think that you’ve lost everything. However, in most cases, all you’ve actually lost is the user profile and most, if not all, of your data is safe and sound.

Must be an administrator

Keep in mind that in order to perform the recovery operations discussed in this article, you must be working from an account with Computer Administrator privileges. If the temporary account that Windows XP creates for you when your original becomes damaged has Computer Administrator privileges, you can use it as a staging area for the recovery operation. If it’s not, you’ll need to log off, then log on to the default Administrator account or to another account that has Computer Administrator privileges. I’ll refer to this as the working account throughout this article.

Backing up your data

The first thing that you’ll want to do is make sure that the data in your original account is safe and then back it up.

To begin the back up operation, launch Windows Explorer and navigate to the C:\Documents and Settings folder.

Then, locate and open your original account folder. At this point, you should see all the files and folders in your

original user profile, as shown in Figure A.
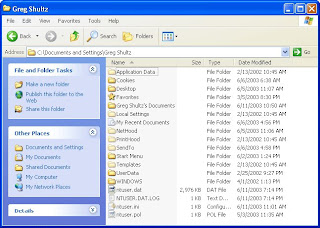
Figure A

You can open your original account folder and back up all the files and folders containing crucial data.

You’ll then want to copy your crucial data files to another location. For example, you’ll definitely want to copy the contents of your My Documents folder, which will appear as UserName’sDocuments. (On my example system, it’s called Greg Shultz’s Documents.) You may als o want copy the contents of the Favorites folder. If you’re using Outlook Express, you can find the files that make up your e-mail messages stored in the Local settings\Application Data\Identities\{#####}\Microsoft\Outlook Express folder. You’ll find your Address Book file in the Application Data\Microsoft\Address Book folder. If you’re using Outlook 2000/XP, you’ll find the PST file in the Local Settings\Application Data\Microsoft\Outlook folder.

Once you’ve backed up your crucial data files, you can proceed with the recovery operation knowing that your

data is indeed safe and sound.

Using System Restore

The first thing to try when attempting to recover a damaged user profile is a System Restore operation. As you know, the System Restore utility is designed to allow you to return your computer to the state it was in at an earlier time period. In this case, the goal is to return your system to the state it was in before the user profile was damaged. Before you attempt this operation, there are two things you need to be aware of. First, if there are multiple user accounts on the system, performing a System Restore operation will return all user profiles to the state they were in at that earlier time. Second, depending on the severity of the damage to the user profile, performing a System Restore operation may not be able to rectify the problem.

You’ll find the System Restore utility on the All Programs | Accessories | System Tools menu. Once you launch

System Restore, you’ll see the Welcome To System Restore page and will simply click Next. On the Select A

Restore Point page, select the last restore point created before the damage to the user profile became apparent,

then click Next. When you’re prompted to confirm the operation, click Next and the restore operation will begin. Once System Restore finishes, it will restart the system. When it does , you can attempt to log on using your original user account. If System Restore was able to successfully recover the user profile, everything should be the way it was. If you’re still unable to log on to your original account, it’s time to escalate your user profile recovery operation to the next level. However, you may first want to undo the System Restore operation.

To undo the System Restore operation, log on to the working account and launch System Restore. When you see the Welcome To System Restore page, you’ll discover a new option titled Undo My Last Restoration. Just select that option, click Next, and follow the onscreen instructions.

Copying your user profile

In this user profile recovery technique, you’ll attempt to revive the user profile by creating a new account and, subsequently, a new user profile. You’ll then copy your old user profile in its entirety to the new account. While this may sound like an operation that will simply replicate the problem over to the new account, it does indeed revive the user profile on occasion. Again, keep in mind that the success of this attempt depends on the severity of the damage to the user profile. However, since it’s a relatively painless operation, it’s worth a shot.

To begin, acces s the Control Panel and launch the User Accounts tool. Next, select the Create A New Account link. Then, give the account a name and click Next. When prompted to pick an account type, make sure the Computer Administrator option button is selected, and then click the Create Ac count button. Once you create the new account, close the User Accounts tool. Then, click Start | Log Off. When you see the Log Off Windows dialog box , click the Log Off button. When you see either the Welcome Screen or the Log On To Windows dialog box, select or type the name you used for the new account. As soon as you do, Windows XP will create a user profile for the new account. When the user profile creation procedure is complete and the system starts up, immediately click Log Off. Then, log back on to the working account.

Now, open the Start menu, right-click My Computer, and select Properties. When you see the System Properties

dialog box, select the Advanc ed tab. Then, locate and click the Settings button in the User Profiles s ection. You’ll

now see a User Profiles dialog box that looks lik e the one shown in

Figure B.
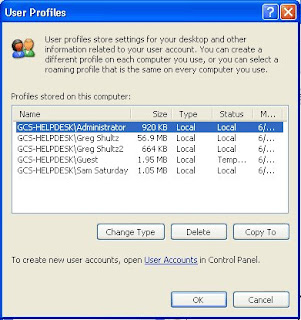
You’ll use the User Profiles tool to copy your old user profile to the new account.

In this example, I’ll be copying the user profile from the Greg Shultz account to the Greg Shultz2 account. I’ll begin by selecting the Greg Shultz user profile and clicking the Copy To button. When the Copy To dialog box appears, click the Browse button and then use the resulting Browse For Folder dialog box to locate the Documents and Settings folder and select the new account. At this point, the Copy To dialog box will look lik e the one shown in Figure C. To continue, just click OK. You’ll then see a confirmation dialog box that informs you that the original files will be deleted and prompts you to confirm the copy operation. Just click Yes.

Figure C
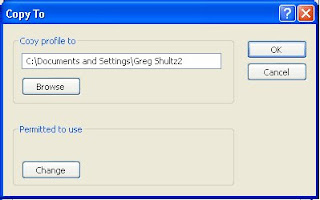
At this point, you’ll see the path to your new acc ount in the Copy To d ialog box.

Once the copy operation finishes, close the User Profiles dialog box and the System Properties dialog box, then log off. At this point, you can attempt to log on to the new account. If this technique was able to successfully recover the user profile, everything should be the way it was. If you’re still unable to log on to your account, it’s time to move to the next level. However, you’ll first need to completely remove the new user account and user profile. To do so, log on to the working account, access the User Profiles dialog box again, selec t the profile, and click the Delete button. Then, access the User Accounts tool and delete the new account and its files.

Moving to a new user profile

In this user profile recovery technique, you’ll move to a new user profile by creating a new account and, subsequently, a new user profile. You’ll then copy your data files and other portions of the user profile from your original to the new one. Keep in mind that when you move to a new user profile in this manner, you will loose all of your personalized settings, such as color scheme, wallpaper, and icons. You’ll follow the instructions I presented earlier for creating a new account and a new user profile. In short, you’ll access the User Accounts tool to create a new account. Then, log on to the new account to create a default new user profile. Finally, log off and then log back on to the working account.

To begin this operation, launch Windows Explorer and navigate to the C:\Documents and Settings folder. Then, locate and open your original acc ount folder. At this point, you should see all the files and folders in your original user profile, as shown earlier in Figure A. Copy the contents of the folders containing the data that you want to move to your new user profile.

In the case of my example system, I’d begin by copying the contents of the C:\Documents and Settings\Greg Shultz\Greg

Shultz’s Documents folder to the C: \Documents and Settings\Greg Shultz2\Greg Shultz2’s folder.

In addition, you’ll want to copy the contents of the Favorites, Outlook Express, and Address Book folders if you’re

using that e-mail program, or the Outlook folder. You may also want to copy the contents of Cookies, Templates, and any other folders that contain critical data files.

Be careful not to copy any files that are spec ifically related to the operating system, as any one of those files

could be the culprit in the case of the corrupted user profile. For example, you definitely won’t want to copy

Ntus er.dat, Ntuser.pol, or Ntuser.ini from your old user profile to your new one.

When you’re finished copying files, log out of the working profile, and then log on to your new user profile. When you do, you should be able to access all of your data files and most of your applications, just as you did with your old profile. However, keep in mind that you may have to reinstall or at least reconfigure some of your applications. And, of course, you’ll need to recreate all your personalized settings.

Cleaning out your old profile

Once you’ve totally moved into your new user profile, you’ll want to permanently delete your old, corrupted us er profile. While you may be tempted to do so from within Windows Explorer, you shouldn’t because it won’t completely remove all the settings associated with your old user profile. To do it the right way, access the User Profiles tool from the Advanced tab of the System Properties dialog box. Once you do, select the old user profile from the list and click the Delete button.

The automatic user profile backup technique

So you won’t ever have to go through all these troubleshooting steps should the user profile ever get corrupted again, you can trick Windows XP into administering the local user profile as if it were a roaming user profile. When you do so, Windows XP will back up your user profile each time you log off. To use this trick, you have to log off your new account and log on to the working account. Then, access the User Profiles tool from the Advanced tab of the Sys tem Properties dialog box, select your user profile, click the Copy To button, and type the name of a folder on another drive in the Copy Profile To text box. Once you complete that part of the operation, launch the Computer Management console, which you can do by

pressing [Windows]-R and typing compmgmt.msc in the Open text box. Then, drill down to System Tools \Loc al

Users and Groups\Users folder. Next, double-click on your account name and select the Profile tab. Then, type

the path to the backup in the Profile Path text box, as shown in Figure D.
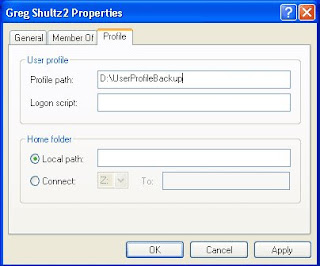
You can configure Windows XP to automatically back up the local user profile each time you log off.
How to Fix SVCHOST.EXE Application Error

How to Repair this SVCHOST.EXE error

After some investigating into the 0X745f2780 SVCHOST error, it became apparent the problem is a corrupted Windows Update in Windows XP. Follow the steps below to fix this error.

Verify Windows Update Service Settings
  • Click on Start, Run and type the following command in the open box and click OK
    services.msc
  • Find the Automatic Updates service and double-click on it.
  • Click on the Log On Tab and make sure the "Local System Account" is selected as the logon account and the box for "allow service to interact with desktop" is UNCHECKED.
  • Under the Hardware Profile section in the Log On Tab, make sure the service is enabled.
  • On the General Tab, the Startup Type should be Automatic, if not, drop the box down and select Automatic.
  • Under "Service Status" on the General tab, the service should be Started, click the Start button enable it.
  • Repeat the steps above for the service "Background Intelligent Transfer Service (BITS)"
Re-Register Windows Update DLLs
  • Click on Start, Run, and type CMD and click ok
  • In the black command window type the following command and press Enter

    REGSVR32 WUAPI.DLL

  • Wait until you receive the "DllRegisterServer in WUAPI.DLL succeeded" message and click OK
  • Repeat the last two steps above for each of the following commands:

    REGSVR32 WUAUENG.DLL
    REGSVR32 WUAUENG1.DLL
    REGSVR32 ATL.DLL
    REGSVR32 WUCLTUI.DLL
    REGSVR32 WUPS.DLL
    REGSVR32 WUPS2.DLL
    REGSVR32 WUWEB.DLL
Remove Corrupted Windows Update Files
  • At the command prompt, type the following command and press Enter
    net stop WuAuServ
  • Still at the command prompt,
    type cd %windir% and press Enter
  • In the opened folder, type the following command and press Enter to rename the SoftwareDistribution Folder
    ren SoftwareDistribution SD_OLD
  • Restart the Windows Update Service by typing the following at the command prompt
    net start WuAuServ
  • type Exit and Press Enter to close the command prompt
Reboot Windows
  • click on Start, Shut Down, and Restart to reboot Windows XP
Although this method may not solve all of the issues with a SVCHOST.EXE Application error, I have found it fixed the problem with the 0x745f2780 reference error.