The steps to find the IP address of your Yahoo Messenger chat friend while chatting with him are:
1. Invite him to share a file in the middle of chat with himIf he accepts the file sharing and starts sharing a file there is connection between your computer and his computer starts. This make your computers in peer to peer mode.
2. Open command prompt and type netstat -n command and press enterNow the list of IP addresses to which your computer has an active TCP/IP connection.
[ I recommend you to perform the same task before establishing the peer to peer connection with your chat friend and note the IP addresses at that time. It will help you to easily identifie your victim's IP address. ]
To get more details than the boring IP address ,you can use the following command.
netstat -a
Note:Please note that while you process the netstat command your computer and his computer should have an active connection. If there is no connection at that time you will get only the Yahoo chat server IP address instead of his IP address.
Wednesday, September 2, 2009


Find the location of an IP address
Here I am going to list some of the IP Address tracking services. You can track the location of an IP address using any of the services below.
1. DNS stuff
2. http://www.ip-adress.com/
3. whoer.net
4 . http://www.ipaddresslocation.org/
5. http://www.whatismyip.com
6. http://www.ipaddresslocation.org/
7. http://www.geobytes.com/IpLocator.htm?Getlocation
These are some of the free IP address resolution services to find the actual location of that IP address.
1. DNS stuff
2. http://www.ip-adress.com/
3. whoer.net
4 . http://www.ipaddresslocation.org/
5. http://www.whatismyip.com
6. http://www.ipaddresslocation.org/
7. http://www.geobytes.com/IpLocator.htm?Getlocation
These are some of the free IP address resolution services to find the actual location of that IP address.
An error occurred while trying to share
Some times after running Windows updates or reinstalling the OS we may face issues with sharing folders in our computer over a network. We may get an error message An error occurred while trying to share . The Server service is not started . The reason for failure in sharing folder is due to the stopped state of lanmanserver service on your computer.
How to start lanmanserver service to fix sharing issue To fix the error "An error occurred while trying to share . The Server service is not started " we need to start the lanmanserver on your computer. The steps to start lanmanserver service are..
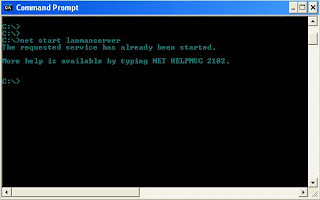
After starting the lanmanserver you will not face any issues in sharing your folder over a Local Network.
How to start lanmanserver service to fix sharing issue To fix the error "An error occurred while trying to share . The Server service is not started " we need to start the lanmanserver on your computer. The steps to start lanmanserver service are..
1. Click on start and go to command prompt
2. On command prompt type "net start lanmanserver" and press enter.
After starting the lanmanserver you will not face any issues in sharing your folder over a Local Network.
Tuesday, September 1, 2009
Safeguard your family's browsing experience with Content Advisor
As a parent you may have concerns about the content your children encounter as they surf the Web. Internet Explorer 6 helps you safeguard your family's browsing experience with Content Advisor, which can be used to control the Web sites that your family can view. With Content Advisor, you can give your children access to a specific list of Web sites that you allow and prevent them from accessing others. Find out how to use it so you can rest easier.
Activate Content Advisor
To activate Content Advisor, you set yourself up as the Supervisor of Content with a password. Don't lose it!
1.On the Internet Explorer Tools menu, click Internet Options.
2.Click the Content tab, and click the Enable button.
3.In the Content Advisor box, click the General tab, and then click the Create Password button.
4.In the Create Supervisor Password box, type the password you want to use.For solid advice about making a secure password,
5.In the Confirm Password box, type the same password again.Internet Explorer requires this to make sure you haven't made a typing error.
6.In the Hint box, type a hint to help you remember your password, and then click OK.Make sure the hint is one your child won't know the answer to. If you can't come up with something, leave it blank. (But then, of course, you're on your own if you forget the password!)
Create Supervisor Password box
7.Click OK in response to the message about Content Advisor, and then click OK once more.Now every time you bump into Content Advisor's protective walls, you'll need to type the supervisor password to get through.
Be careful! Don't lose your password. To turn off Content Advisor or make any changes whatsoever, you'll need your supervisor password. Store it in a child-proof place away from your computer.
Limit Access to Web Sites
With Content Advisor activated, you can create a list of Web sites that can always be viewed by your family. If someone attempts to access a Web site that is not on your approved list, they will be prompted for the Content Advisor Supervisor password to proceed. To create your list of approved and disapproved Web sites, activate Content Advisor using the instructions above and then follow these steps:
1.On the Internet Explorer Tools menu, click Internet Options.
2.Click the Content tab, and click the Settings button.
3.You will be prompted for the Supervisor password. Enter your password and click OK.
4.In the Content Advisor box, click the Approved Sites tab.
5.In the field for Allow this Web site, type in the Web address that you want to allow or disapprove.
6.Click the Always button to add the site to your list of approved Web sites. Or you can click the Never button to restrict access to the site. To remove a site from your list of approved and disapproved sites, click the site name, and then click the Remove button.
7.When you're finished, click OK.
Approved Sites tab in Content Advisor box
Turn off Content Advisor
1.On the Internet Explorer Tools menu, click Internet Options.
2.Click the Content tab, and click the Disable button.
3.In the Password box, type your supervisor password, and click OK. All users will once again have free access to all sites.
Change Your Supervisor Password
Perhaps someone guessed your password, or perhaps you're simply following good security measures and changing your password often. Whatever the reason, you can change your password by following these steps:
1.On the Internet Explorer Tools menu, click Internet Options.
2.Click the Content tab, and click the Settings button.
3.In the Password box, type your supervisor password, and click OK.
4.In the Content Advisor box, click the General tab, and click the Change Password button.
General tab in Content Advisor box
5.In the Old password box, type the password you're using now.This lets Internet Explorer know that you are authorized to change the password.
6.In the New password box, type the new password.
7.In the Confirm new password box, type the new password again.
Change Supervisor Password box
8.Type a hint to help you remember your new password, and click OK.
Activate Content Advisor
To activate Content Advisor, you set yourself up as the Supervisor of Content with a password. Don't lose it!
1.On the Internet Explorer Tools menu, click Internet Options.
2.Click the Content tab, and click the Enable button.
3.In the Content Advisor box, click the General tab, and then click the Create Password button.
4.In the Create Supervisor Password box, type the password you want to use.For solid advice about making a secure password,
5.In the Confirm Password box, type the same password again.Internet Explorer requires this to make sure you haven't made a typing error.
6.In the Hint box, type a hint to help you remember your password, and then click OK.Make sure the hint is one your child won't know the answer to. If you can't come up with something, leave it blank. (But then, of course, you're on your own if you forget the password!)
Create Supervisor Password box
7.Click OK in response to the message about Content Advisor, and then click OK once more.Now every time you bump into Content Advisor's protective walls, you'll need to type the supervisor password to get through.
Be careful! Don't lose your password. To turn off Content Advisor or make any changes whatsoever, you'll need your supervisor password. Store it in a child-proof place away from your computer.
Limit Access to Web Sites
With Content Advisor activated, you can create a list of Web sites that can always be viewed by your family. If someone attempts to access a Web site that is not on your approved list, they will be prompted for the Content Advisor Supervisor password to proceed. To create your list of approved and disapproved Web sites, activate Content Advisor using the instructions above and then follow these steps:
1.On the Internet Explorer Tools menu, click Internet Options.
2.Click the Content tab, and click the Settings button.
3.You will be prompted for the Supervisor password. Enter your password and click OK.
4.In the Content Advisor box, click the Approved Sites tab.
5.In the field for Allow this Web site, type in the Web address that you want to allow or disapprove.
6.Click the Always button to add the site to your list of approved Web sites. Or you can click the Never button to restrict access to the site. To remove a site from your list of approved and disapproved sites, click the site name, and then click the Remove button.
7.When you're finished, click OK.
Approved Sites tab in Content Advisor box
Turn off Content Advisor
1.On the Internet Explorer Tools menu, click Internet Options.
2.Click the Content tab, and click the Disable button.
3.In the Password box, type your supervisor password, and click OK. All users will once again have free access to all sites.
Change Your Supervisor Password
Perhaps someone guessed your password, or perhaps you're simply following good security measures and changing your password often. Whatever the reason, you can change your password by following these steps:
1.On the Internet Explorer Tools menu, click Internet Options.
2.Click the Content tab, and click the Settings button.
3.In the Password box, type your supervisor password, and click OK.
4.In the Content Advisor box, click the General tab, and click the Change Password button.
General tab in Content Advisor box
5.In the Old password box, type the password you're using now.This lets Internet Explorer know that you are authorized to change the password.
6.In the New password box, type the new password.
7.In the Confirm new password box, type the new password again.
Change Supervisor Password box
8.Type a hint to help you remember your new password, and click OK.
Friday, August 7, 2009
Quickly gather MAC addresses in Windows XP with ARP
When securing a wireless Windows XP network, in addition to using Wired Equivalent Privacy (WEP) or Wi-Fi Protected Access (WPA) encryption, you can use Media Access Control (MAC) address filtering.
When you enable MAC address filtering, the wireless access point or wireless router verifies that the network card in the computer requesting access has a MAC address in its filter list before allowing the computer to access the network. This means that you must first obtain the MAC addresses of each client computer. To do so, you might think that you have to manually visit each computer and use the Getmac command.
An easier way to gather MAC addresses is to take advantage of the Address Resolution Protocol (ARP) command. Here’s how:
1. From one computer, use the Ping command to ping each of the other client computers that will connect to the wireless access point or wireless router.
2. Type the ARP command along with the -a parameter:
Arp -a
When used with the -a parameter, the ARP command displays the ARP cache, which stores the IP and MAC addresses of the computers that most recently accessed the system—or in this case, those computers that responded to the Ping command
When you enable MAC address filtering, the wireless access point or wireless router verifies that the network card in the computer requesting access has a MAC address in its filter list before allowing the computer to access the network. This means that you must first obtain the MAC addresses of each client computer. To do so, you might think that you have to manually visit each computer and use the Getmac command.
An easier way to gather MAC addresses is to take advantage of the Address Resolution Protocol (ARP) command. Here’s how:
1. From one computer, use the Ping command to ping each of the other client computers that will connect to the wireless access point or wireless router.
2. Type the ARP command along with the -a parameter:
Arp -a
When used with the -a parameter, the ARP command displays the ARP cache, which stores the IP and MAC addresses of the computers that most recently accessed the system—or in this case, those computers that responded to the Ping command
Shortcut to SHUTDOWN your computer
1. Right click your desktop
2. Create new shortcut
3. Shutdown –s –t 60
4. Then put any name
5. Change the icon
6. Double click the icon your computer will be shutdown with in 60 sec
Do u want to Cancel shutdown - Go to RUN type shutdown –a
2. Create new shortcut
3. Shutdown –s –t 60
4. Then put any name
5. Change the icon
6. Double click the icon your computer will be shutdown with in 60 sec
Do u want to Cancel shutdown - Go to RUN type shutdown –a
Thursday, July 16, 2009
You cannot start the Windows Firewall service in Windows XP SP2
SYMPTOMS
After you install Microsoft Windows XP Service Pack 2 (SP2), you cannot start the Windows Firewall service. Specifically, you experience one or more of the following symptoms:
This problem is caused by a missing or corrupted SharedAccess.reg file. The SharedAccess.reg file represents the Windows Firewall service.
After you install Microsoft Windows XP Service Pack 2 (SP2), you cannot start the Windows Firewall service. Specifically, you experience one or more of the following symptoms:
- Windows Firewall/Internet Connection Sharing (ICS) is not displayed in the Services list in Control Panel.
- Windows Firewall/Internet Connection Sharing (ICS) is displayed in the Services list, but you cannot start this service.
This problem is caused by a missing or corrupted SharedAccess.reg file. The SharedAccess.reg file represents the Windows Firewall service.
Note The Windows Firewall service in Windows XP SP2 replaces the Internet Connection Firewall (ICF) service in earlier versions of Windows XP.
To add the Windows Firewall entry to the registry, follow these steps:
Method 1: Call the "Setup API InstallHinfSection" function to install Windows Firewall
To install Windows Firewall, follow these steps:- Click Start, click Run, type cmd, and then click OK.
- At the command prompt, type the following command line, and then press ENTER: Rundll32 setupapi,InstallHinfSection Ndi-Steelhead 132 %windir%\inf\netrass.inf
- Restart Windows,
- Click Start, click Run, type cmd, and then click OK.
- At the command prompt, type the following command, and then press ENTER: Netsh firewall reset
- Click Start, click Run, type firewall.cpl, and then press ENTER. In the Windows Firewall dialog box, click On (recommended), and then click OK.
Method 2: Add the Windows Firewall entry to the registry
Important This section, method, or task contains steps that tell you how to modify the registry. However, serious problems might occur if you modify the registry incorrectly. Therefore, make sure that you follow these steps carefully. For added protection, back up the registry before you modify it. Then, you can restore the registry if a problem occurs. For more information about how to back up and restore the registry, click the following article number to view the article in the Microsoft Knowledge Base:322756 (http://support.microsoft.com/kb/322756/ ) How to back up and restore the registry in Windows
To add the Windows Firewall entry to the registry, follow these steps:
- Copy the following text into Notepad, and then save the file as Sharedaccess.reg:
-
Windows Registry Editor Version 5.00

[-HKEY_LOCAL_MACHINE\SYSTEM\CurrentControlSet\Services\SharedAccess]

[HKEY_LOCAL_MACHINE\SYSTEM\CurrentControlSet\Services\SharedAccess]
"DependOnGroup"=hex(7):00,00
"DependOnService"=hex(7):4e,00,65,00,74,00,6d,00,61,00,6e,00,00,00,57,00,69,00,\
 6e,00,4d,00,67,00,6d,00,74,00,00,00,00,00
"Description"="Provides network address translation, addressing, name resolution and/or intrusion prevention services for a home or small office network."
"DisplayName"="Windows Firewall/Internet Connection Sharing (ICS)"
"ErrorControl"=dword:00000001
"ImagePath"=hex(2):25,00,53,00,79,00,73,00,74,00,65,00,6d,00,52,00,6f,00,6f,00,\
 74,00,25,00,5c,00,73,00,79,00,73,00,74,00,65,00,6d,00,33,00,32,00,5c,00,73,\
 00,76,00,63,00,68,00,6f,00,73,00,74,00,2e,00,65,00,78,00,65,00,20,00,2d,00,\
 6b,00,20,00,6e,00,65,00,74,00,73,00,76,00,63,00,73,00,00,00
"ObjectName"="LocalSystem"
"Start"=dword:00000002
"Type"=dword:00000020

[HKEY_LOCAL_MACHINE\SYSTEM\CurrentControlSet\Services\SharedAccess\Epoch]
"Epoch"=dword:00002cd0

[HKEY_LOCAL_MACHINE\SYSTEM\CurrentControlSet\Services\SharedAccess\Parameters]
"ServiceDll"=hex(2):25,00,53,00,79,00,73,00,74,00,65,00,6d,00,52,00,6f,00,6f,\
 00,74,00,25,00,5c,00,53,00,79,00,73,00,74,00,65,00,6d,00,33,00,32,00,5c,00,\
 69,00,70,00,6e,00,61,00,74,00,68,00,6c,00,70,00,2e,00,64,00,6c,00,6c,00,00,\
 00

[HKEY_LOCAL_MACHINE\SYSTEM\CurrentControlSet\Services\SharedAccess\Parameters\FirewallPolicy]

[HKEY_LOCAL_MACHINE\SYSTEM\CurrentControlSet\Services\SharedAccess\Parameters\FirewallPolicy\DomainProfile]

[HKEY_LOCAL_MACHINE\SYSTEM\CurrentControlSet\Services\SharedAccess\Parameters\FirewallPolicy\DomainProfile\AuthorizedApplications]

[HKEY_LOCAL_MACHINE\SYSTEM\CurrentControlSet\Services\SharedAccess\Parameters\FirewallPolicy\DomainProfile\AuthorizedApplications\List]
"%windir%\\system32\\sessmgr.exe"="%windir%\\system32\\sessmgr.exe:*:enabled:@xpsp2res.dll,-22019"

[HKEY_LOCAL_MACHINE\SYSTEM\CurrentControlSet\Services\SharedAccess\Parameters\FirewallPolicy\StandardProfile]

[HKEY_LOCAL_MACHINE\SYSTEM\CurrentControlSet\Services\SharedAccess\Parameters\FirewallPolicy\StandardProfile\AuthorizedApplications]

[HKEY_LOCAL_MACHINE\SYSTEM\CurrentControlSet\Services\SharedAccess\Parameters\FirewallPolicy\StandardProfile\AuthorizedApplications\List]
"%windir%\\system32\\sessmgr.exe"="%windir%\\system32\\sessmgr.exe:*:enabled:@xpsp2res.dll,-22019"

[HKEY_LOCAL_MACHINE\SYSTEM\CurrentControlSet\Services\SharedAccess\Setup]
"ServiceUpgrade"=dword:00000001

[HKEY_LOCAL_MACHINE\SYSTEM\CurrentControlSet\Services\SharedAccess\Setup\InterfacesUnfirewalledAtUpdate]
"All"=dword:00000001

[HKEY_LOCAL_MACHINE\SYSTEM\CurrentControlSet\Services\SharedAccess\Enum]
"0"="Root\\LEGACY_SHAREDACCESS\\0000"
"Count"=dword:00000001
"NextInstance"=dword:00000001 - Double-click Sharedaccess.reg to merge the contents of this file into the registry and to create the Windows Firewall entry.
- Restart Windows.
- Click Start, click Run, type cmd, and then click OK.
- At the command prompt, type the following command, and then press ENTER: Netsh firewall reset
- Click Start, click Run, type firewall.cpl, and then click OK.
- Configure the Windows Firewall settings that
- Click Start, click Run, type services.msc, and then click OK.
- In the list of services, locate Windows Firewall/Internet Connection Sharing (ICS). Notice that the status of the service is Started.
- For information about how to use the Services feature, click Help on the Action menu.
Subscribe to:
Posts (Atom)